These controls are used to add and delete users of a Remote Services account and to modify users’ access to the account and connected security systems.
Please take note: Your version of the remote service software may say "Add New User" instead of "Invite New User"
Depending on the type of control panel in your system, you may be working with 4-digit or 6-digit user codes.
Managing the Users on an account is restricted to Administrators.
Certain actions are accessible only to the System Administrator/Master User.
To manage Users (add/invite, delete, change settings)
On the website:
(Scroll down for more on User management in the apps)
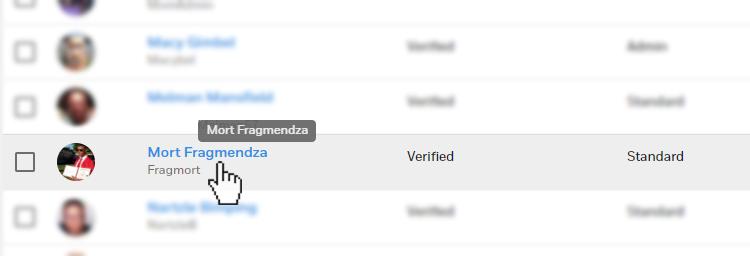
- The Users list is seen here in a condensed view; you may have to scroll or zoom to see everything on your screen.
- User management tools appear at upper right on the users list page. They are explained below.

Notes:
- In the Name and User Type columns, click
 (or
(or  ) to choose between A-Z or Z-A alphabetical sorting.
 - In the Name column, click the
 arrow to sort by first or last name.
 - To the right of each entry, click
 to expand the user’s information and see which Locations the person has access to.
 - Click the checkbox to the left of a user's name for a dropdown offering Enable, Disable and Delete options, discussed below. (You can click the checkbox to the left of the Name column heading at top to select all users.)


User tools

 Export user records as a .PDF, .CSV or Excel (.xls) file. (See the FAQ Can I export a list of Users? for more information.)
 Synchronize user data between the Remote Service and your system’s security panel. This button should only appear if you are signed in as the System Administrator/Master User.
  Invite (create / add a new user)
 Refine a search by filtering for User Type or other criteria.
  Click to start a search. Enter all or part of a user’s real name or username. If you want to search names / user names only with no filters, begin your search here.
 - Note that the
 button may not be offered if the Users list has only a few entries. If that is the case, click OK after setting up search filters.

To create (add) a user in your Remote Services account:
1. Click 
2. Enter first and last names
3. Use the dropdown to select the new user’s level of privileges and permissions:
- Administrators can create new users, delete users or disable users without deleting them from the system. Administrators can also initiate User Sync operations. (See the FAQ "Why are there different types of users?" for general information about user types and the FAQ "What is User Sync?" for more about synchronizing your system's records with the remote service.)
- Standard users can log into a remote services account from the website or mobile apps to control various features and functions. However, Standard users cannot create, delete or modify other users’ access to the system. You may also hear your security professional refer to Standard users as "normal" or "regular" users.
- Panel Only users cannot log in to remote services and can only operate the system control panel at specificed Locations.
4. Select a user name
5. Decide if you want the system to require a user code whenever this user arms/disarms or clears an alarm. See the FAQ What does "Prompt for User Code" mean?
6. Choose whether "normal” 12-hour time is displayed for this user, or 24-hour time (1:00 PM appears as ’13:00’, etc.)
7. Under normal circumstances, make sure the User Status switch is set to Enabled. You can disable a user's account without deleting it by setting this switch to Disabled. Note that this control may not be visible during addition/creation of a new user, but will be available after setup.
8. Enter an email address where the new user will receive a Welcome Email from Remote Services.
9. Under Access, use the checkboxes to set what features and which Locations this user will be able to operate.
- Setting a user code: After selecting a location(s) where the new user has access, the User Code field can be filled in. To assign a User Code, click in the User Code field and enter a unique sequence of 4 or 6 numbers from 0 - 9.
- You will have the option to set this code for use in multiple Locations on your account, or just for the Location where you are currently setting up the new user's access.
- See the FAQ What are User Codes? for more information on how these codes are used.
- In this area, you can also designate a user who has administrator privileges as a Partition Manager. See the FAQ "What is a Partition Manager?" for more information.
10. Click Save. The Users list displays the user you have added. In addition, the Welcome email message is sent to the new user.
- The recipient must click the link in the message to validate the email address and set a password. Rules for creating a secure password are shown.
To delete a user from a Remote Services account:
1. On the Users list, click the checkbox next to the user (or multiple users) you want to delete.

2. From the Select Action dropdown above the list, select Delete Users. The system requests confirmation.
3. Click Yes and then...
4. Click OK.
To Delete a user from one system in a multi-Location account (but not from the entire account) :
Don't use the Delete command in the Select Action dropdown on the users list. Instead...
1. On the users list, click on the name of the user you want to delete from a single system.
2. The user’s details appear. Locate the Access area on the right side of the screen.

3. Select the checkbox for the system from which you want to delete the user and click DELETE USER.
The system requests confirmation.
4. Click Yes. The Users list returns.
To Disable a user without deleting them from the account
1. On the Users list, click the checkbox next to the user (or multiple users) you want to delete.
2. From the Select Action dropdown above the list, select Disable Users.
3. Take note of this warning displayed by the system:

This means the user is deleted completely from security system(s) at the Locations where he/she had access. The user's profile is retained by Remote Services, except for his/her user code. Enter a user code when you enable this user again; you may use the same code the user had previously.
4. To proceed, click DISABLE USERS. The selected user(s) is disabled, but not deleted from the account.
To Enable or Delete a Disabled user
1. On the Users list, display disabled users. (Click  Filter and select 'Disabled', then click OK.)
Filter and select 'Disabled', then click OK.)2. Click the checkbox next to the disabled user(s) you want to enable or delete from the account.
3. From the Select Action dropdown above the list, select Delete Users or Enable Users. The system requests confirmation.
4. Click ENABLE USERS or Yes (to confirm a Delete) as appropriate.
To initiate User Sync from the Users list
If a user's information needs to be synchronized between Remote Services and security system control panel(s), the words Not Synced will appear at far right under Sync Status.
1. At the top of the screen, click the  User Sync button.
User Sync button.2. The system confirms that synchronization has been initiated.

User Management on the apps
On iPhone:
- Touch
 More, then
  Settings, then Users
 - The Users list appears, modified for mobile screens
- As on the website, tap users' checkboxes for Enable/Disable/Delete actions or touch a user's name to open and edit the user's details


On iPad:
- Touch
 Users on the navigation bar at the bottom of the screen
 - The Users list appears
- As on the website, tap users' checkboxes for Enable/Disable/Delete actions or touch a user's name to open and edit the user's details

On Android:
- Touch
 , then
  Settings, then
  Users
Users - The Users list appears, modified for mobile screens
- As on the website, tap users' checkboxes for Enable/Disable/Delete actions or touch a user's name to open and edit the user's details


